

Every planting season, farmers invest heavily in chemical inputs, expecting high returns. However, simply buying premium bags of Nitrogen, Phosphorus, and Potassium (NPK) or Urea is only half the battle. How and where you place fertilizer determines whether it feeds your crops or vanishes into thin air.
Improper application methods—such as surface broadcasting or applying nutrients too close to the main stem—can quickly lead to crop losses. Recently, we have witness the costly results of “fertilizer burn” and excessive leaching every season. To protect your investment and build up soil health, agronomy experts recommend a fundamental field technique: The 4-Finger Rule.
What is the 4-Finger Rule?
The 4-Finger Rule is a precision farming measurement technique used during localized side-dressing or spot-application of granular fertilizers. By placing four fingers flat on the ground between the crop’s base and your digging tool, you establish a safe lateral distance of exactly 5 to 8 centimeters (2 to 3 inches) away from the stem.
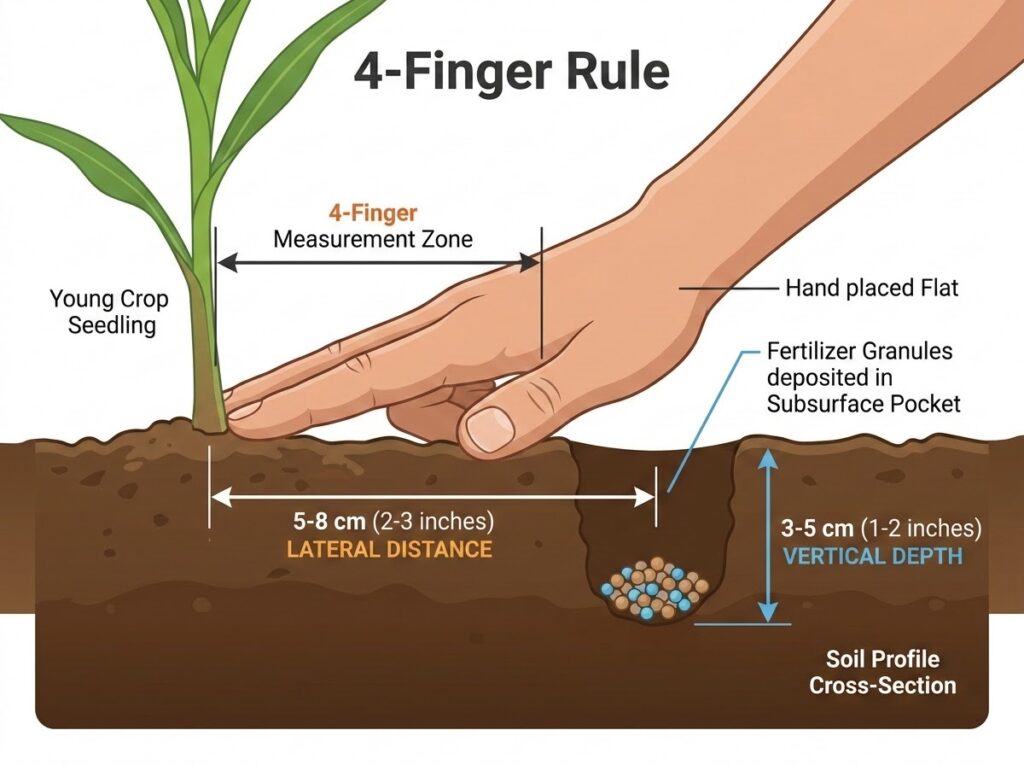
This method operationalizes the Right Place pillar of the globally recognized 4R Nutrient Stewardship Framework. The 4Rs require matching agricultural practices to site-specific crop dynamics:
- Right Source: Select a fertilizer blend matching your specific crop and soil properties.
- Right Rate: Match applied nutrients to soil supply and crop demand.
- Right Time: Align applications with peak crop growth stages and nutrient uptake windows.
- Right Place: Deliver nutrients directly to the root zone while minimizing environmental losses.
The Science Behind the 4-Finger Distance
1. Preventing Fertilizer Burn (Osmotic Shock)
Chemical fertilizers contain concentrated, highly soluble mineral salts. When placed right next to a seedling’s tender stem, these salts dramatically increase the osmotic pressure of the surrounding soil water. Instead of absorbing water, the plant experiences reverse osmosis: the soil draws water out of the root system, dehydrating the tissue. This results in standard “fertilizer burn,” characterized by blackened root tips, leaf scorching, and seedling death.
2. Targeting Dynamic Feeder Roots
Plants feature a split root system. Thick structural roots plunge downward directly below the stem for stability, while lateral feeder roots branch outward horizontally to hunt for food and moisture. Dropping fertilizer right at the base misses the active nutrient-absorption zone entirely.
3. Maximizing Nutrient Absorption Efficiency
In summer crops like maize, localized hole application dramatically improves the nutrient accumulation rate compared to uniform surface spreading. Spacing fertilizer at the 5–8 cm mark puts nutrients directly where the feeder roots will intercept them within days, optimizing growth.
Step-by-Step Implementation Guide
Step 1: Calibrate with Your Hand
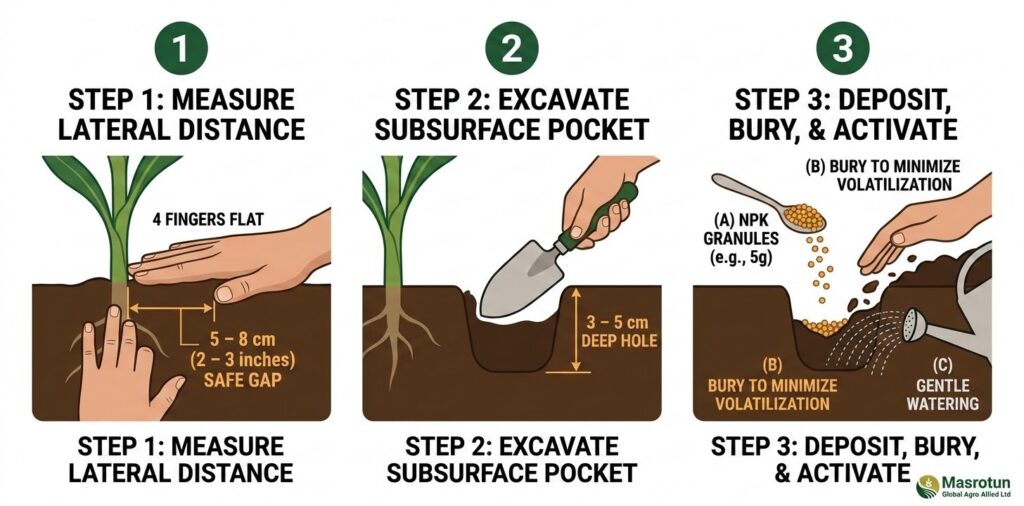
Weed your crop row cleanly before getting started. Place your dominant hand flat on the damp topsoil, lining your index finger flush against the seedling’s base. The edge of your pinky finger automatically marks your 5–8 cm boundary.
Step 2: Excavate a Sub-Surface Soil Pocket
At the exact outer edge of your pinky finger, use a hand trowel or dibber stick to dig a distinct hole or semi-circular trench 3 to 5 centimeters deep. Why depth matters: Deep subsurface placement protects nutrients like phosphorus, which are highly immobile in the soil profile and must sit near root pathways to be absorbed.
Step 3: Measure and Deposit the Accurate Rate
Avoid eyeballing your fertilizer dosage. Use a calibrated tool, such as a recycled bottle cap or plastic spoon, to measure a standardized 5 grams of NPK or Urea per plant. Drop the granules directly into your dug hole.Precision Farming
Step 4: Seal the Pocket (The Burial Step)
Push the loose dirt back over the hole and tamp it down firmly. Never leave fertilizer granules exposed on top of the ground. Preventing Nitrogen Volatilization: Unburied nitrogen fertilizers (like Urea) react with soil moisture and surface heat, converting rapidly into ammonia gas. Uncovered fertilizer can lose up to 40% of its nitrogen content to the atmosphere within 48 hours.
Step 5: Provide Activation Moisture
Gently water the soil right after burying the granules. Dry fertilizer cannot be processed by the plant; moisture is required to break the granules down into plant-available ions.
Adapting Spatial Rules Across Crop Growth Cycles
Adapting your fertilizer strategy to match the crop’s development is essential for maximizing yield and protecting your investment. As a crop matures, its root architecture expands and its nutritional demands shift from structural growth to reproductive production.
Here is a comprehensive breakdown of the stages outlined in your guide:1. Young Seedlings (1–2 Weeks Post-Emergence)
- Primary Goal: Establish structural root development using Phosphorus and Potassium (NPK).
- The Logic: At this stage, the plant is extremely vulnerable to “fertilizer burn” (osmotic shock). Placing concentrated fertilizers too close to the stem can cause the soil to draw moisture out of the plant, leading to dehydration and death.
- Method: Subsurface Spot Hole. Use the “4 Fingers Flat” gauge to maintain a 5–8 cm distance from the stem. This safe gap prevents chemical damage while ensuring nutrients are buried within reach of the tender root system
2. Mid-Vegetative Phase (4 Weeks or Knee-High)
- Primary Goal: Support rapid stalk and leaf expansion, which requires a heavy intake of Nitrogen (Urea/CAN).
- The Logic: The plant is growing larger and faster, meaning its root system has branched out significantly. A single spot hole is no longer sufficient to feed the entire plant; it now needs a continuous supply line as it prepares to enter the flowering phase.
- Method: Side-Dress Linear Banding. Increase your distance to 10–15 cm (the width of your palm). Applying fertilizer in a line along the row allows the expanding feeder roots to intercept the Nitrogen over a larger area as the plant reaches its peak growth velocity.
3. Generative Stage (Flowering/Fruit Setting)
- Primary Goal: Optimize grain filling and increase fruit weight using Potassium-heavy blends.
- The Logic: The plant has finished its main vegetative stretch and is channeling energy into reproduction. The feeder roots have now extended to their maximum horizontal range. Applying nutrients too close to the stem at this point would be a waste, as the active “drinking” roots are located further out at the edge of the plant’s canopy.
- Method: Outer Ring Placement. Use a full “Hand-Span” (thumb to pinky) as your gauge to place fertilizer 20–25 cm away from the stem. Creating a ring around the plant at this distance targets the perimeter feeder roots, delivering potassium directly where it can be most efficiently utilized for fruit and grain development.
Common Mistakes to Avoid in the Field
- Broadcasting over Wet Leaves: Tossing NPK or Urea across your crop canopy allows granules to stick to wet foliage, which completely burns your crop’s leaves.
- Applying During Peak Drought: Adding fertilizer to dry soil without irrigation creates a high-salt environment that aggressively dehydrates your crop’s roots.
- Neglecting Weed Control: Weeds have aggressive root structures that can easily outcompete your crops for buried nutrients. Always weed your field before placing any fertilizer.
References
- 4R Nutrient Stewardship Framework: Scientific criteria outlining the unified approach to Right Source, Right Rate, Right Time, and Right Place resource management. Verified via The Fertilizer Institute (TFI) Global Standards and localized agricultural applications from Nutrients For Life Foundation.
- Subsurface Placement & Volatilization Mitigation: Field data documenting nutrient retention and structural dynamics of banding techniques. Verified via the MDPI Agriculture Journal on Mechanized Fertilization Methods and Farm Radio International Extension Scripts.
- The 5–8 Centimeter Distance Rule: Technical parameters for localized spot and ring applications to bypass osmotic crop burn. Sourced via verified extension guides on Agronomy Field Best Practices.
